Showing posts with label white. Show all posts

Friday, 10 January 2014

Budget Laundry Makeover

We have been living in our current house for 18 months now, it's an old small weatherboard home built in the 1950's. When we bought it the prior owners had put in a nice little kitchen, bathroom, curtains and carpet, and so although we want to make changes nothing was really screaming out for a makeover...nothing that is except the laundry!


I didn't get a good shot of the before laundry, firstly because it is so small 1.8m x 1.8m square
 ( approx 6 ft 1 inch square), and secondly because I actually just didn't think of it at the time. But I did find these pictures above and I figure you would get the idea, rusty wash tub, water damaged chipboard cupboard, broken glass in the window, lino laid over older lino which was torn and walls made out of painted plywood...to add to its attraction, it is situated in a little room of its own one step outside the back door, like many houses in Australia during this era. It therefore quite easily became the dumping ground for all types of junk, much to my despair!


Within a couple of months I couldn't stand it any longer and seeing as we were very short of funds thought I would prefer it totally gutted than to continue with it the way it was. My trusty helper came to the rescue and removed just about everything. It looked something like this all over.


Nice huh?

It was at this stage that we made the decision to remove the window entirely, just to make some more wall space, I wasn't totally sure about this as it did let in the lovely morning sunshine, but I was finally convinced...especially considering we never shut the door when we're in the laundry because of the space, so the light comes in through the door too.


Fast forward through the winter months when nothing happened, school holidays arrived and it was time to do some more. We wanted to keep costs down to the very bare minimum, which meant not moving the plumbing etc. We considered plastering and initially were going to do that, but the cost of getting someone in was going to break our budget and we were not confident to give it a try ourselves for the first time in such a small space, so we decided to line it with pine boards.


You can just make out the laundry tub here, it was my $15 auction bargain that is as good as new, just needed a good clean. I had been pricing the exact same tub at hardware stores the week before...they were $169. I was so excited! 


Fast forward a few more months and our next chance to get things done was after Christmas in the summer break...this past week in fact. But I hadn't been sitting around just waiting. This huge cupboard had been in the 'man cave' for the best part of a decade, but I knew it would be perfect in the new laundry, so out it came for a makeover.


This cupboard is a real showpiece...originally an office cupboard from the historic Inveresk Railyards in Launceston, which is now home to the Queen Victoria Museum. I knew this cupboard would be special when painted. I chose Blake & Taylor furniture paint because it is so easy to apply and I love the colour schemes available. French Blue and Old White on the outside, and a mixture of French Blue, Blush Pink, French Linen and Kettle Green on the inside. With Blake & Taylor paint there is no need to prime, which I love. I did do a quick sand on the outside and then washed it all down to get off the years of grime. One coat did the inside, I applied two coats on the outside and then finished with a light wax.


I found these cupboard knobs at Paraphernalia and thought they'd be perfect.

Time to paint the walls. I chose white to brighten things up a bit. Primed the walls once, then one 4 litre tin provided two coats on the walls. Things were starting to happen!


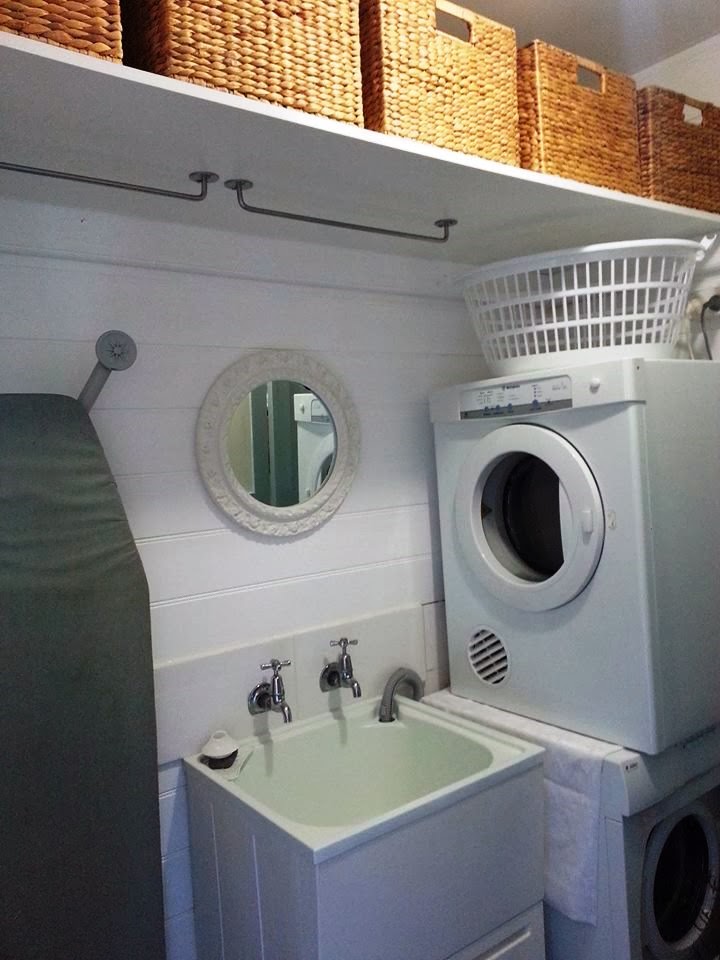
Within a couple of days the rest was done. The cupboard was moved in, hubby found two white ceramic tiles left over from the kitchen to put above the laundry sink and installed a shelf the length of the wall over the sink also. I bought one basket to match the other four I already had and they found their home on the shelf. We installed hooks to hang up the ironing board, clothes airer and mop and broom, and some rails to hang some washing .


I made some decorative touches.


We're finished! All up everything came to well under $500, which we thought was pretty reasonable.


Now I just want to be there all the time! Hope you like it, Lisa xx

Friday, 9 August 2013

Upcycled CD cabinet

Upcycle is a buzz word which has been around for a few years now. For those unfamiliar it means turning something that is now waste or considered outdated into something of use, like when I turned vintage doilies into a bathroom curtain the other day. You can read about that here. My post today is about an upcycled CD storage cabinet which will find a new life.


Here is the original CD storage cabinet. In its day...which wasn't that long ago, it was a very nice piece of furniture. This one is well made from pine, is quite heavy and I would imagine it had a hefty price tag brand new. I however managed to pick it up at the auction last week for a bargain price of $20. Such is the downside of technology changing so quickly...lots of landfill in the making!


Now I need to make it clear...this is not my original idea. I think I first saw this on Pinterest, but I haven't been able to find it again. If you know who originally had this idea please let me know so I can give credit to that person. My first job was to remove these plastic inserts which actually held the compact discs in place.


Looks easy enough...sounds easy enough...just remove the screws...oh wait, and the staples, hadn't noticed those, actually the easy part was the idea, the removal of this plastic was much harder than I imagined. If you have lovely small dainty hands you'll probably do this part much better, but I struggled working in the confined space of the cabinet. I had to stop after 30 minutes of struggling to go to the hardware store and buy a Philips head screwdriver with a short handle ($10) so that I could fit it and my hand inside the space to remove the screws. It didn't stop my hand rubbing against the plastic on the other side however...this was the result.


So about now I was contemplating giving up, I guess sheer determination and that $30 already spent kept me going! After all the screws were removed, I used a chisel to pry the plastic away from the staples and then pliers to remove the staples.


Seriously I thought this would be a fifteen minute job, may thirty minutes tops, but after two and a half exhausting hours (not counting my trip to the hardware store) and sore and aching hands, all plastic was finally removed! ( I did recycle the screws).


So with that job out of the way the fun was about to start!


There were lots of small holes from the screws and the staples that needed filling, and then a light sand all over was in order, thank goodness the mouse sander was small enough to fit inside the cabinet!


All ready for painting.


I chose Blake & Taylor furniture paint. I had the same issue with the painting, as I did with removing the screws, it was so hard to get my hand and the brush inside the confined space. I'm very pleased that I had Blake & Taylor paint because it doesn't require a primer and was easy to apply even with the difficulty of getting inside the cabinet. I love it!


First coat done. The interior is Kettle Green, the exterior is Old White.


The finished product, with its intended use illustrated. I used two coats of green paint and three coats of white then finished it off with one coat of wax.


I am so totally happy with my finished toilet roll storage solution! It is perfect for my very small bathroom/toilet room. The paint came up beautifully and I am very glad I persevered when the going got tough...would I do it again? Probably not. The amount of work involved in this project makes it a perfect once in a lifetime do-it-yourself project, which is well worth doing.  Lisa xx

Wednesday, 10 July 2013

Vintage Winter Whites

The weather in Tasmania, where I live,  is always beautiful, you just need to appreciate the different seasons. In the last week the temperature has dropped as we near mid-winter, just yesterday the state's coldest town Liawenee had its lowest temperature since they started recording. All of that for Launceston residents generally means waking up to a beautiful blue sky and lots of white frost over everything.

So today I thought seeing as so many of us are enjoying the white frost and the snow on the mountains I would find some white vintage products from other Australian Etsy sellers to share with you all. I hope you enjoy the browse and keep warm. Lisa xx

Australian Westminster Coffee Pot With White Embossing
Nostalgia Bloom

Collectable Cameo black and white oval button.
Villa by the Sea
Beautiful Vintage Australian WHITE ceramic vase.
A Creative Life

vintage white leather ice skates, size 7.5, made in england
epochco

Vintage 1960s mod white chunky geometric plastic bangles
evaelena

1970s KNIT BABY BONNET
Poppys Treasure Box
VIntage 1960s Beauty Case in Pearl White and Musk Pink
The Fox and the Spoon

Vintage Porcelain Glove Mould Rosenthal Germany Industrial Display Jewellery Shop Prop
Little Flea Vintage