Friday 10 January 2014

Budget Laundry Makeover

We have been living in our current house for 18 months now, it's an old small weatherboard home built in the 1950's. When we bought it the prior owners had put in a nice little kitchen, bathroom, curtains and carpet, and so although we want to make changes nothing was really screaming out for a makeover...nothing that is except the laundry!


I didn't get a good shot of the before laundry, firstly because it is so small 1.8m x 1.8m square
 ( approx 6 ft 1 inch square), and secondly because I actually just didn't think of it at the time. But I did find these pictures above and I figure you would get the idea, rusty wash tub, water damaged chipboard cupboard, broken glass in the window, lino laid over older lino which was torn and walls made out of painted plywood...to add to its attraction, it is situated in a little room of its own one step outside the back door, like many houses in Australia during this era. It therefore quite easily became the dumping ground for all types of junk, much to my despair!


Within a couple of months I couldn't stand it any longer and seeing as we were very short of funds thought I would prefer it totally gutted than to continue with it the way it was. My trusty helper came to the rescue and removed just about everything. It looked something like this all over.


Nice huh?

It was at this stage that we made the decision to remove the window entirely, just to make some more wall space, I wasn't totally sure about this as it did let in the lovely morning sunshine, but I was finally convinced...especially considering we never shut the door when we're in the laundry because of the space, so the light comes in through the door too.


Fast forward through the winter months when nothing happened, school holidays arrived and it was time to do some more. We wanted to keep costs down to the very bare minimum, which meant not moving the plumbing etc. We considered plastering and initially were going to do that, but the cost of getting someone in was going to break our budget and we were not confident to give it a try ourselves for the first time in such a small space, so we decided to line it with pine boards.


You can just make out the laundry tub here, it was my $15 auction bargain that is as good as new, just needed a good clean. I had been pricing the exact same tub at hardware stores the week before...they were $169. I was so excited! 


Fast forward a few more months and our next chance to get things done was after Christmas in the summer break...this past week in fact. But I hadn't been sitting around just waiting. This huge cupboard had been in the 'man cave' for the best part of a decade, but I knew it would be perfect in the new laundry, so out it came for a makeover.


This cupboard is a real showpiece...originally an office cupboard from the historic Inveresk Railyards in Launceston, which is now home to the Queen Victoria Museum. I knew this cupboard would be special when painted. I chose Blake & Taylor furniture paint because it is so easy to apply and I love the colour schemes available. French Blue and Old White on the outside, and a mixture of French Blue, Blush Pink, French Linen and Kettle Green on the inside. With Blake & Taylor paint there is no need to prime, which I love. I did do a quick sand on the outside and then washed it all down to get off the years of grime. One coat did the inside, I applied two coats on the outside and then finished with a light wax.


I found these cupboard knobs at Paraphernalia and thought they'd be perfect.

Time to paint the walls. I chose white to brighten things up a bit. Primed the walls once, then one 4 litre tin provided two coats on the walls. Things were starting to happen!


Within a couple of days the rest was done. The cupboard was moved in, hubby found two white ceramic tiles left over from the kitchen to put above the laundry sink and installed a shelf the length of the wall over the sink also. I bought one basket to match the other four I already had and they found their home on the shelf. We installed hooks to hang up the ironing board, clothes airer and mop and broom, and some rails to hang some washing .


I made some decorative touches.


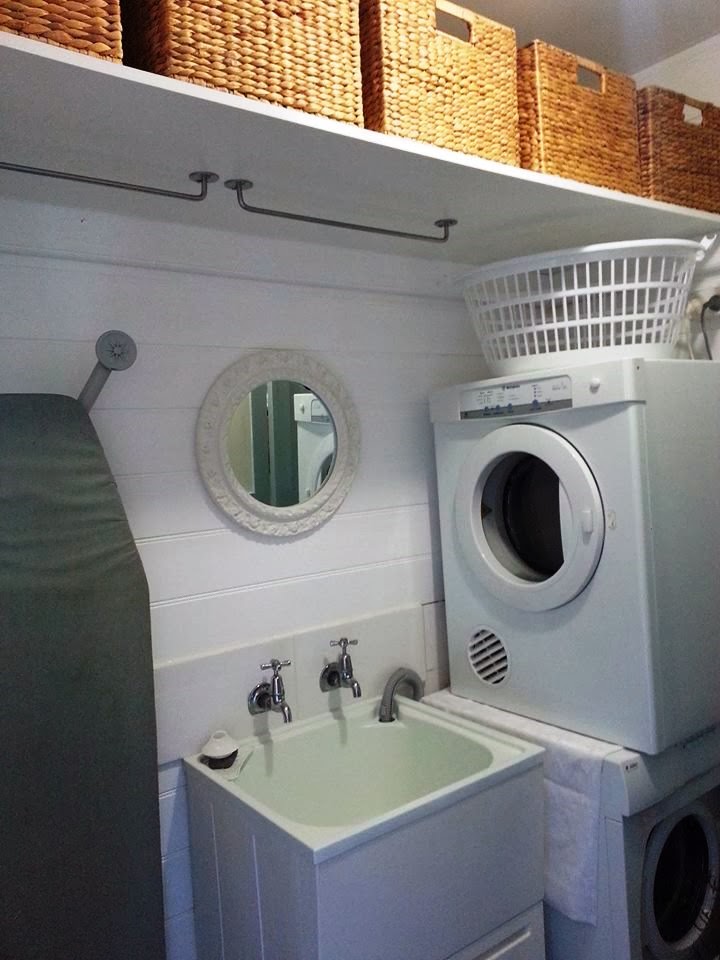
We're finished! All up everything came to well under $500, which we thought was pretty reasonable.


Now I just want to be there all the time! Hope you like it, Lisa xx

Thursday 14 November 2013

Refurbished Carver Chair

I thought I would start this blog with the finish today....just for something different. At least the finished chair all wrapped up, as it was last weekend, as an engagement present for a lovely young couple I know who are soon to be married.


 I had always thought this chair was special. I bought it at a community fundraising auction in a little country town. The picture below shows exactly what it looked like, except perhaps it was a little dirtier. I knew I wanted to try and fix it, although at the time I had no idea what to do with that big gaping hole where the seat should have been.


 The first step involved sanding back, not too hard a job this time given it was already pretty much in a raw state. I chose to paint it with Blake & Taylor furniture paint. My young engaged couple chose their own colours...although they had no idea they were doing so at the time. A lovely combination of Old White and French Linen.


 I used two coats of each paint colour on the chair, no need to prime with this easy to apply paint. I then rubbed it all over with a piece of steel wool, a little harder in spots to lightly distress, and then finished off with a natural beeswax finish.


 Here it is all ready for the upholstery work, which for the first time required me to use webbing.


 I used elastic webbing for the seat as the lovely salesperson at the upholstery supply shop told me I should...good enough reason for me...well actually she said it was much stronger than the jute version which is normally used for the backs of chairs now. Simply a matter of stretching the webbing one piece at a time and then weaving over and under in a criss cross pattern. All pretty easy...with the right tool! Which is this, a web stretcher.


That rubbery piece at the top rests against the chair while the sharp piece at the end pulls the web tight., so you can tack it into place. This little baby didn't come cheap. I paid over $40 AU for it two years ago, but if you are planning on doing a few of these jobs then it's an absolute must. I couldn't have done without it!

Once the webbing was in place, a covering of hessian (burlap) is tacked into place. This is how it looks underneath. I love seeing things come together!


Once the hessian was completed, the steps are exactly the same as the window seat / storage box that I completed a few months ago, you can follow the directions here But in a nutshell, it involves, foam, Dacron, calico and then fabric.


Tacking around the back corners of the chair was tricky...I would imagine it gets easier with practise, but also the right tools again. I ran out of tacks and sent my hubby off to buy some more. He came back with more tacks and this..a proper upholstery tool. I love him! So much easier!


Final steps involve attaching the trim with a hot glue gun and attaching the bottom cloth.


And here it is the finished product.
 Did you notice the beautiful upholstery linen on the chair? It is the lovely Bohemian Blooms from the very talented designer Thea Samios of Thea and Sami 
I had some left over from a previous project.


and the Before and After...always such fun!


I hope you like it! Lisa xx

Friday 13 September 2013

Refurbished School Bookcase

I really cannot remember how long this old education department bookcase has been in our home. 
We either bought it at a school fair or claimed it when it was being thrown out at our local school
...I can't even remember the details it's been so long.
What I can tell you is that it has always been large, solid and very practical. It has also always looked well past its prime. It had stains, pin holes, a few small gouges and the varnish had pretty well gone on the top. I wish I had a better photo than this of it in its original condition, but this will have to do!


The bookcase has always been on my to-do list, but because it was so practical and held so much, it was always keenly sought after in each of our children's bedrooms. So much so that when one child moved out, the other often had it in their room and packed full of things before I had a chance to get to it.
Recently my youngest son was the third of our children to leave home, and of course my youngest and sole remaining child at home desired the bookcase for her room. This time I put my foot down. It was not being used again until it was fixed up!


Filling up the holes with wood Polyfilla was the first step. It then received a good going over with the mouse sander. I found this bookcase easier to work on with it laying down on it's back.


This was the selection of Blake & Taylor Furniture Paints that I chose from. I settled on French Linen for the interior of the bookcase and Old White for around the outside and the edges.


Because it is still not uncommon for it to rain each day I brought the bookcase inside to my usual painting spot. Inside the front door...not ideal but at least it is sunny and bright! Just gets a little tricky when someone knocks on the door :)


Here is the bookcase after a couple of coats of the French Linen. In all I painted three coats on the interior. Because it is Blake & Taylor's paint I didn't need to prime, which I love, and the paint is just so easy to apply and cleans up easily with water. 


It was at this stage that my foggy brain realised I remembered I now had a spare room to work in and so I moved the whole show into my son's old room and stretched out...aaahhhh!
Here I am beginning to apply the first coat of the Old White...can you see why I love this colour? This photo also gives you an idea of what the bookcase actually looked like before painting.


Applying the white took a few hours because I'm a bit fussy when it comes to the finish. The edges needed a very controlled hand, so I just took my time. For those of you who have been following my blog, each of the colours from Blake & Taylor that I have used so far are still all coming from the same 1 litre tin each...this paint is very economical!


You're probably wondering exactly what colour the French Linen looks like. The two last photos show what the colour can look like depending on the light. At first I thought it was the camera, but the paint can look either like natural linen (which is the colour), or sometimes almost grey depending on the light inside the house. Fortunately I like both looks.


The final step was a natural beeswax finish. Normally I would carry everything outside in the light to show you the true colours, but as my husband has been away on school camp all week, I've had to lug this baby all over the place myself...I just couldn't bring myself to move it again.


And again!
 A very modern look for a bookcase that has served
 many, many years in classrooms and bedrooms.


 The before and after. I have one very happy daughter. I hope you like it too. Lisa xx

Friday 30 August 2013

Vintage Weddings

Weddings are such beautiful events. A time when all is right with the world for the couple who are choosing to become a family. My youngest son recently became engaged, and so my thoughts have naturally turned to weddings and the importance of love and family.

Being a lover of all things vintage I popped over here to see what other Australian Etsy sellers have found that could help to make a vintage themed wedding complete. Enjoy! Lisa xx
Vintage Gloves Women's - White
Sparrow Finds